
The main use for your Sorare cards is to play them in SO5 competitions. In these competitions you select 5 players to score points for you and compete against other managers to earn NFT cards and Etherium. To win card rewards we will typically need to hit 350 points in regular competitions or 425+ in the amateur draft competitions – so we need to be choosing players that can score in the 70-80 range and have the potential for a perfect 100 score.
The Sorare scoring matrix can be a bit of black hole to new players, so across a couple of articles I’m going to run you through how the scoring matrix works and how it influences which players to use in your line-ups. This article focuses on midfielder scoring, you can find scoring for the other positions here.
If you haven’t signed up to Sorare and fancy giving it a go, sign up via this referral link and earn a free limited card when you collect five cards via New Card Auctions.
Scoring Overview
Before we dig down in to the nitty-gritty of the scoring matrix, let’s go through the basics of scoring. Players generate two scores through their actions during a game which combine to form an overall score that maxes out at 100.
The Decisive Score rewards players for key positive actions such as scoring, assisting or making a goal line clearance for outfield players and keeping a clean sheet or saving penalties for goalkeepers. Players are punished for key negative actions such as giving away a penalty or being sent off for all players and conceding 3 or more goals for goalkeepers.
The all-around score awards positive and negative scores to players for their more minor actions throughout the game. There are a number of statistics in categories covering possession, attacking, defending, goalkeeping and a general category. The point weighting for each statistic varies by position.
If a player has a net positive decisive score, then a negative total all-round score is ignored. Otherwise, negative all-around scores will reduce the total player score.
Decisive Scores
Players start with a Decisive Score of 0, and so earn 35 points or 25 if they are a substitute. Each positive decisive action adds one to the score and each negative decisive action takes on away from the score.

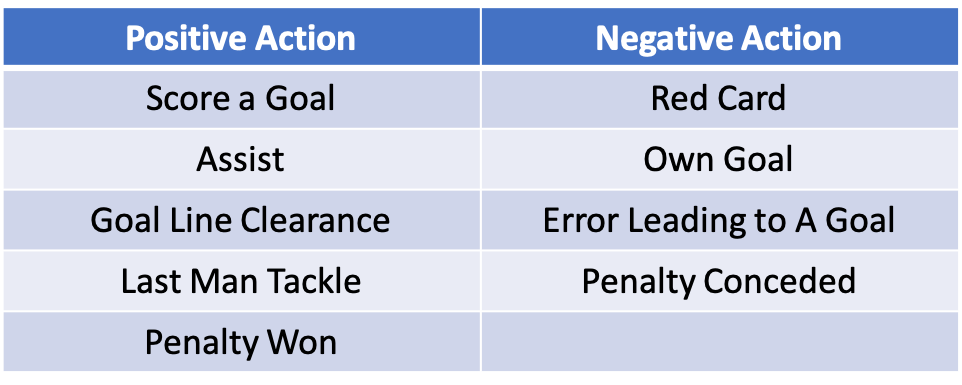
In the table below we can see the decisive actions that outfield players can score. For the positive actions, should see some predictability in scoring goals and assisting others for the more attack minded midfielders. The other three aren’t really predictable and we would expect to see many of the two defensive minded actions for midfielders.
On the negative side, there aren’t really any actions we can accurately predict. I guess we would lean towards more defensive minded midfielders have a greater chance of getting one of the four decisive actions. However, we shouldn’t expect any of them to be common events.
All-Around Scores
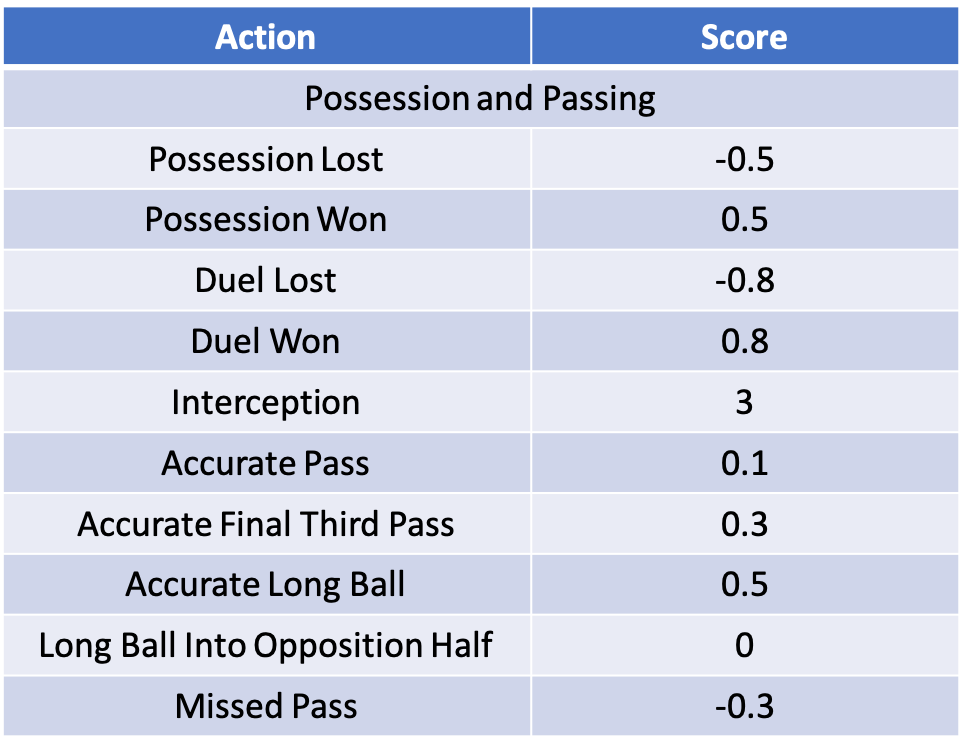
Pretty balanced as you might expect for the players in the middle of the park. The points for winning and losing duels/possession are balanced. A standard accurate pass is worth less for completing than missing a pass. But the boosts for long and final third passing push the completion points upward. Definitely a benefit for more attack minded players who are ambitious in their passing.
However, there is big points to be scored from interceptions, which you would expect to see from more defence minded players that might not record many of the ambitious passes. So it may be we see pretty even possession and passing scoring between attack and defensive minded midfielders.
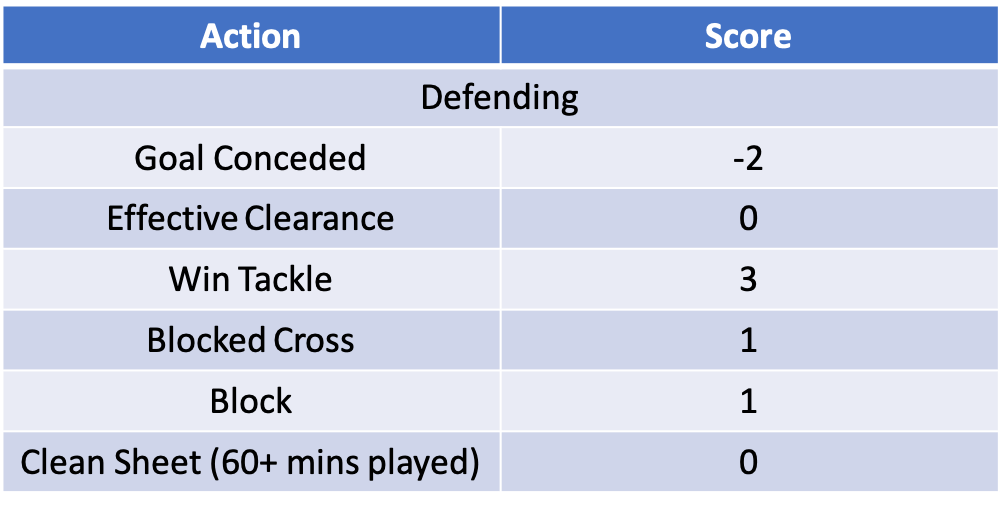
In the defending category we can see midfielders have a less points to earn than defenders. In particular, they can’t earn any points for a clean sheet, although they do lose less points for goals conceded as a result.
In terms of the other categories, clearances aren’t rewarded for defenders but we wouldn’t expect to see many from midfielders regardless. The remaining categories all earn some solid points and should benefit defence minded midfielders. Having said that, I’m not sure how many blocked crosses we’ll see from midfielders regardless of where they play in the field.
The attacking category predominantly provides ways to boost scores with a couple of expensive exceptions. Missing a penalty or a big chance costs a whopping 5 points and can go a long way to killing a scores. On the other hand there are plenty of points on offer for creating chances and registering shots on target.
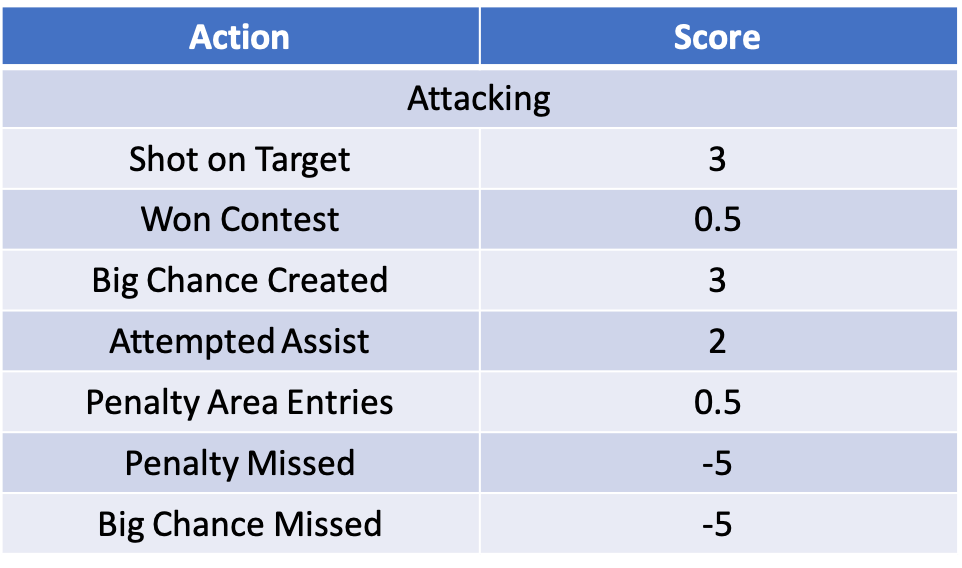
The points for fouling and being fouled are even, but the cost of making significant defensive mistakes are pretty high. Midfielders will lose 3 points for either receiving a yellow card or making an error that leads to a shot. On the positive side, the rewards for doubles and triples don’t change across the outfield positions and provide an opportunity to score big points. Given they are rewarded for defensive actions they generally favour defence minded players.
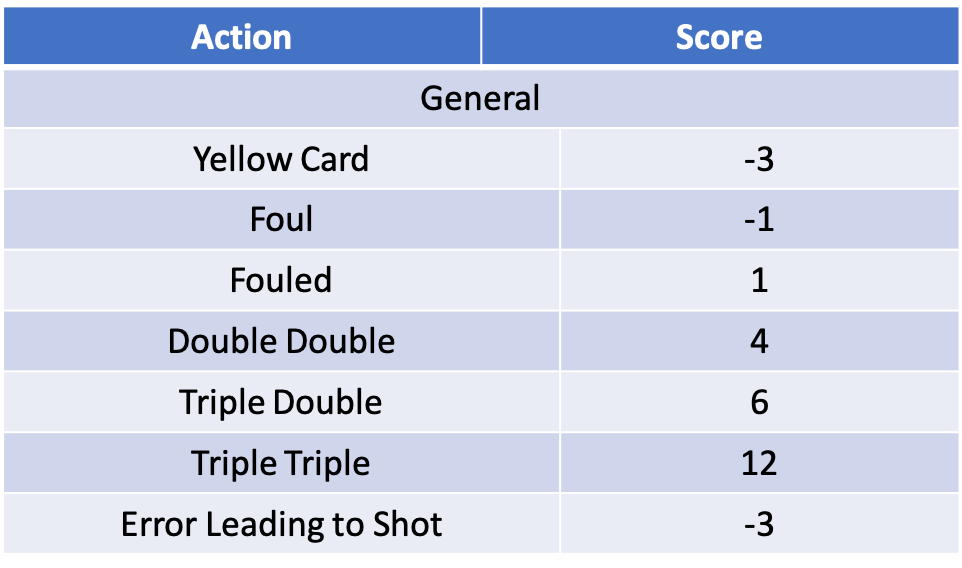
What are Doubles and Triples?
Double Doubles, Double Triples and Triple Triples reward defenders for accumulating multiple actions in a number of categories. A double double requires a player to record two of the below action twice (i.e. 2x tackles and 2x interception). A double triple requires two of the actions to be recorded three times, whilst a triple triple requires all three actions to be recorded three times
- Tackle
- Interception
- Net Duels won (= Duels won – Duels lost)
How do the top Midfielders do it?
Finally, let’s take a look over the top 10 ranked midfielders on Soraredata and see how they earn their scores. We have a couple of questions to answer to help inform our midfielder selections;
- Do we need to prioritise decisive actions, or can we have success through big all-around scores?
- Is there a particular profile of midfielder we should prioritise?
Firstly, what types of players do we have in our sample?
In terms of position, our top 10 midfielders are heavily skewed toward more attack-minded positions. Just one of the top 10 midfielders would be considered a defensive midfielder, Joshua Kimmich, and in a dominant Bayern side he has plenty of opportunities to play progressive passes. Really, there is no midfielder you would consider a true midfield enforcer.
There are a couple of midfielders the play mostly in a more balanced central role. The remaining seven midfielders play in a more advanced role with just one of seven considered a pure winger.
Given the breakdown of players, unsurprisingly the players generally play for one of the top teams in their division and play the majority games. For the rest of the analysis we’re going to look at each players scores from their last 15 eligible games. In total we have 137 appearance between the 10 players out of a possible 150.
How often do the top midfielders kill our line-up?
We’re going to define killing a line-up as scoring under 50 points. With one player under 50 it’s almost impossible to win in Amateur competitions and it’s very hard in regular competitions as well.
Overall, our top midfielders score less than 50 points in just 15% of games, very similar to the 16% we found for defenders. From those games, 2 came in substitute appearances and one involved the players scoring a negative decisive. Given the sample of players is heavily focussed on central attacking players, there isn’t much value in looking at the splits by position.
On the other hand, how often do the top midfielders excel?
We’re going to define excelling as scoring 90 points or more. That would put us on pace for 450 points before any bonuses are included and keeps us in the race for a podium.
Overall, our top midfielders exceed the 90 point mark just shy of once every 5 games (19%) slightly behind the top defenders who came in at 24%. We can’t take too much from it, but it’s worth noting Kimmich (1) was one of two players with less than two 90+ scores, the other being Bruno Fernandes (0) surprisingly.
To hit a score of 90+ a decisive is basically a requirement. Across the 10 players a decisive was scored in 96% of 90+ scores. There was just one games where a decisive wasn’t scored!
How often do the top midfielders keep us in the hunt for a card reward?
We’re going to define keeping us in the hunt as scoring 70+ points. A full 5 of 70 would get us to 350 points before bonuses are considered which would get us right a round the card rewards – with bonuses it should earn reward the majority of the time. In Amateur competitions, five 70s would not be enough for a reward. But hitting a 70 gives us a chance if one or two of the others can hit big scores.
Our midfielders hit a 70+ score in a very respectable 60% of the time. That’s right in line with the top full backs although they are significantly more decisive dependant. The pictures a little better than for the 90+ scores, but our top midfielders still hit a decisive in 85% of 70+ scoring games!
Conclusions
If we want to hit big scores we need midfielders with the potential to score decisive actions. Without one midfielder are very unlikely to make the 70 point mark much less 90+. With that in mind, it makes a lot of sense that we need to focus on attack minded midfielders who get in position to score or assist more often. In particular we want central midfielder who see a lot of the ball to add AA scores on top of the decisive.
Our sample of top midfielders score a decisive in 54% of the games they play, so it’s not a guaranteed thing by any means. We need to target midfielders in strong match-ups to maximise their chances of getting that all important decisive!
If you have any questions on the scoring matrix or anything else Sorare – drop a comment below or send me a message on Twitter @ThinkingFantasy

Leave a comment